Self-Hosted DNS Based Adblock on All Devices
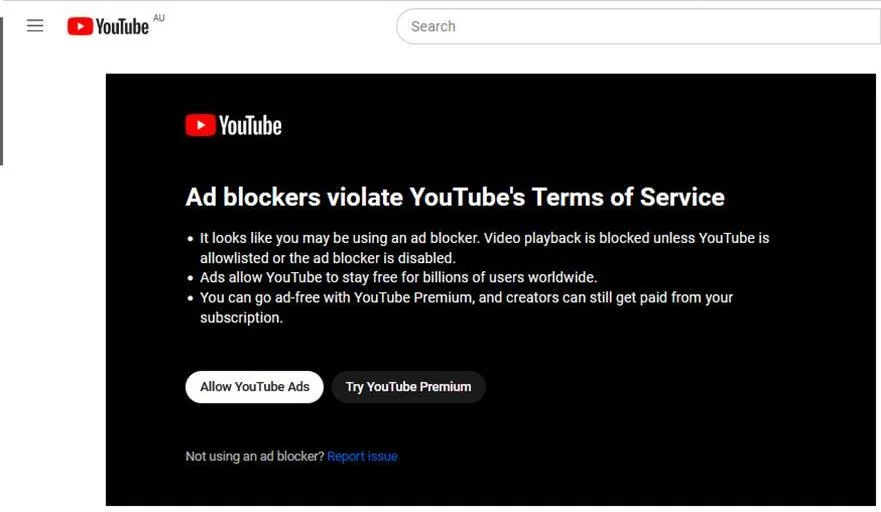
As websites start to detect and counter ad-blockers, blocking pesky ads across devices is becoming more annoying. Especially on phones, where you might want to block ads in apps which is impossible in iOS. For example, Youtube now looks like this if you don’t subscribe to Youtube premium and have an adblocker installed:
The solution I have landed on and will outline in this post is
to use an open source adblocking DNS server AdGuardHome,
and Tailscale for having all devices in the same network to
securely use this DNS server on all your devices. The advantage of using Tailscale is that
you won’t need to expose your DNS server to the internet, it will always be private. We
also use docker and docker-compose to deploy AdGuard.
If you are like me, you want to self-host as much as possible which means using some public DNS servers to accomplish this doesn’t have quite the level of configurability that might be necessary. This post will outline how to set this up on your own. Only a basic understanding of networking is needed to be able to follow along and set this up on your own.
Tailscale Setup Part 1
I’d recommend setting up Tailscale first, since it makes setting up AdGuard much easier. Thankfully, Tailscale is a pretty amazing piece of software and should be easy to setup anywhere. For the sake of this guide, we will assume that you have an account (the free tier is more than enough for our needs), and that we are installing the DNS software on a basic debian server. We can install Tailscale easily enough (we won’t talk about the bad practice of piping random stuff from the internet to sh):
$ curl -fsSL https://tailscale.com/install.sh | sh
$ sudo tailscale up
In the Tailscale console, you should see your devices that have Tailscale installed on. We will come back to configure Tailscale later.
The devices page should look something like:

AdGuard Setup
As a first step, you should setup AdGuard on a server or one of the non-phone devices on your network. In my case, I simply installed it on a cloud based server. For the most part, network topology here doesn’t matter, as long as it meets Tailscale’s requirements. For the sake of this post, I will use a basic debian Linux server as an example.
AdGuard has some really good installation docs, but in my opinion the easiest way to install is to just use the public docker image that they ship. To set this up from scratch, you should run the following commands in Linux:
#!/bin/bash

# Update apt and install docker
sudo apt update && sudo apt install docker.io docker-compose

# Start the docker daemon
sudo systemctl start docker

# Add your user to the docker group. Importantly, swap out ${user} with your linux user.
# Not sure what this is? Try to run 'echo $USER' on your command line.
sudo usermod -aG docker ${user}
Once docker is up and running on your server, you can run AdGuard with docker-compose.
Create a file called docker-compose.yml, and populate it with the following:
version: "3"
services:
  adguard:
    image: adguard/adguardhome
    restart: unless-stopped

    # Need to define ports that we want to expose to the world. AdGuard
    # has good docs here:
    # https://github.com/AdguardTeam/AdGuardHome/wiki/Docker#create-and-run-the-container
    # however, I just used the ones listed here. Note that we are matching
    # ports, except for port 80, which we map to 8080 on the host. I do
    # this since I have other things running on 80, however you could
    # easily do `80:80` if you'd like.
    ports:
      - "53:53/udp"
      - "3000:3000"
      - "8080:80"

    # For persistence, we want to mount a local directory for AdGuard to
    # use. Swap out the paths here for a path on your machine to store these.
    # Not sure what to use? I'd recommend something like `~/.adguard/`
    volumes:
      - "/your/path/to/store/config:/opt/adguardhome/conf"
      - "/your/path/for/work/dir:/opt/adguardhome/work"
volumes:
  adguard_config:
    external: true
  adguard_work:
    external: true
Note that you might need to manually create the volumes using docker create volume adguard_config.
Once this file is setup, we want to start AdGuard in the background using something like:
$ docker-compose up >adguard.logs 2>&1 &Note you could do something a bit more complicated to make sure this process starts whenever your server starts.
Now that we have AdGuard running, we want to configure it. AdGuard provides a nice UI to
do a first time setup and install. If you have installed AdGuard on a computer, you can
simply go to http://localhost:3000 and follow the steps. If you have installed
on a server, there is a really easy way to access this setup UI via the tailnet we have
setup using Tailscale. From the Machines page of the Tailscale Admin console see
screenshot above), simply find the machine that is hosting AdGuard. Grab the IP address
for it listed in the Addresses column. From your computer (that is also connected to your
tailnet), you can access the AdGuard UI by using that IP address, ie.
http://100.x.y.z:3000.
Ensure that during this setup you don’t change the default port from 80. However, since we
used docker to map that port you will be able to access the console from
http://100.x.y.z:8080. This console is good for seeing the stats for the DNS server.
Note the port you tell AdGuard to use is the port within the docker container, which we
always put on 80.
Now, it is completely preference, however I like to use the Cloudflare DNS servers. So in
the Settings tab under Upstream DNS servers I have tls://1.1.1.1 and Google’s set as
a backup: tls://8.8.8.8. Note that the tls:// tells AdGuard to use DNS-over-TLS (a
more secure way to do DNS). Feel free to omit the tls:// and just use the IP addresses
directly.
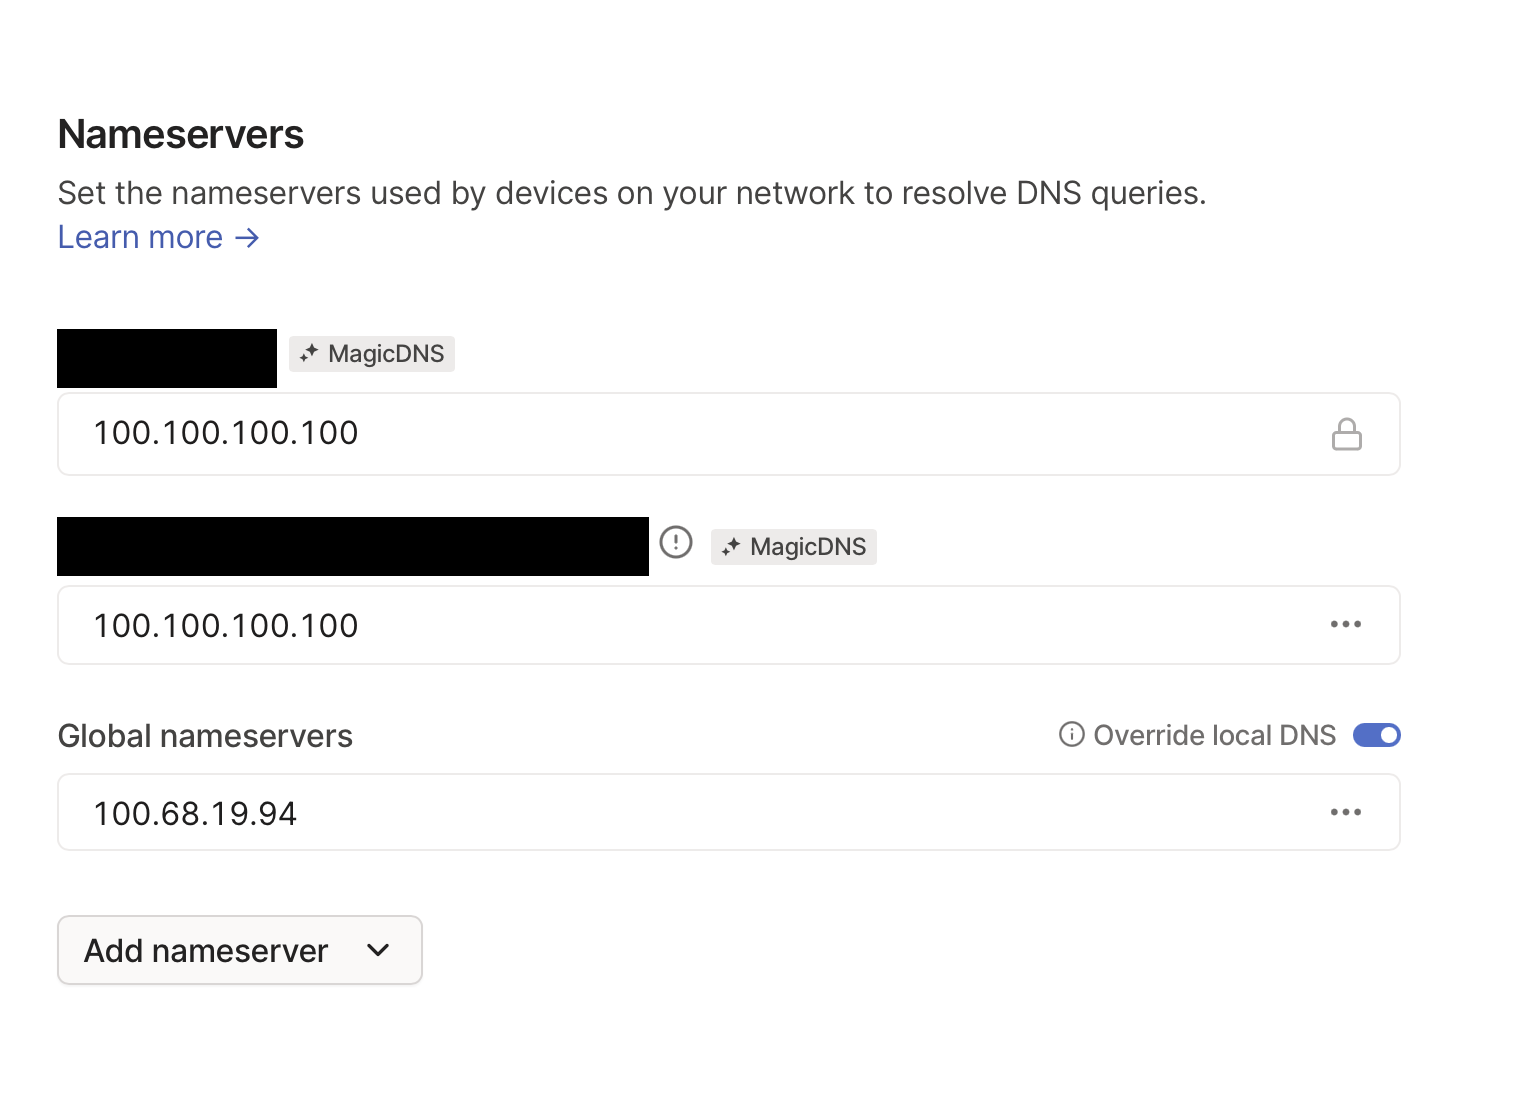
Tailscale Setup Part 2
Now that we have our tailnet setup, and AdGuard running on one of the machines in the
network, we will want to tell Tailscale to use the AdGuard DNS server instead of the
default nameservers. In the DNS tab in the Tailscale console, we can simply change the
Global nameservers to the Tailscale IP address (ie. 100.x.y.z) of the machine that is
running AdGuard. Feel free to delete the global ones. Ensure that Override local DNS is
turned on. This looks like:
Conclusion
Using this setup, you will get an adblocker across your entire network of devices. Not only that, it will be done with a self-hosted DNS server that is secured to only your devices and not need to be exposed to the internet. So far, this setup has proven to be extremely effective for my use cases, and can be adopted for your workflow as well.
Additionally, if you truly want to self-host everything you could drop-in OpenVPN or another self-hosted VPN solution. However, after working with VPNs in a professional context, it is my opinion that self-hosting a VPN is not worth the effort. Especially when Tailscale is extremely easy to setup and configure, and *just works* on every device I have tried it on. Especially with mobile devices, where you can get Tailscale to just override the DNS server your mobile device uses without any extra setup.
If you ever run into issues with the DNS server, you can easily turn this off by either disconnecting your device from the tailnet, or modifying the DNS settings back in the Tailscale console.
If you have trouble setting this up, or have other thoughts feel free to reach out to me and I can help you :)